How to Track Which Blog Posts Drive Signups and Revenue
Learn how to tag posts, track signups, and attribute revenue so you can see which articles actually drive customers, not just clicks.

NoirTrack team·Follow

Track each post with UTMs, fire a signup goal, and connect payments so revenue is tied back to the visit that started it. In practice, that means one tagged link pattern, one conversion event, and one revenue source view. This breaks down if your links are untagged, your sales happen on another domain without setup, or you never connect payments.
To track which blog posts drive signups and revenue means you can see which article brought a visitor, which one led to a signup, and which one led to money. Most blog reports stop at pageviews, so a post can look busy while it never brings a signup or sale. The fix is to connect each article to a tracked source, a signup goal, and your payment data, then read the numbers by source, campaign, and revenue.
This post shows the simplest workflow: tag the links, record the conversion, and read the results by post so you can tell which articles deserve more effort and which ones do not.
How do you tag blog posts so signups can be traced back?
Tag each blog post with a consistent campaign pattern so every visit keeps the article name attached from the first click to the signup event. That lets you track which blog posts drive signups and revenue without guessing which share link, bio link, or email send got the credit. Use one naming scheme across your own share buttons, author bios, newsletter links, and paid promotions so one post does not split into several source lines.
- Pick one campaign name per post. Use the post title or a short slug in
utm_campaign, then keeputm_sourceandutm_mediumstable for the channel. A link for a post shared on X can look like this:
https://yoursite.com/blog/post-title?utm_source=x&utm_medium=social&utm_campaign=post-title
That format gives you a readable source, channel, and campaign in the dashboard, and NoirTrack groups those visits automatically. The UTM parameters guide shows a few clean ways to tag every link you share.
-
Use the same tag on every link to the same post. If the same article appears in a newsletter, an author bio, and a pinned social post, each of those links should use the same campaign value. Changing
utm_campaignfrompost-titletospringon one link andnewsletter-blaston another makes one article look like three small campaigns instead of one page that actually converted. -
Keep the tag readable enough to compare later. A campaign name like
how-to-write-landing-pagestells you more thanspringbecause you can match it to the post without opening another tab. NoirTrack reads UTM parameters automatically and groups visits by source and campaign in the Campaigns & UTM doc, so the same campaign name should mean the same article every time.
What should the link format include?
Use utm_source, utm_medium, and utm_campaign on every shared post link, and add utm_content only when you need to separate two variants of the same post. utm_source names where the link lives, utm_medium names the channel type, and utm_campaign names the post or promotion itself. That keeps the report readable and lets you compare one article against another without manual cleanup.
Which action should count as a signup?
Track the one action that proves the signup happened, such as account creation, demo request, or email opt in. If a button click opens a form, do not count the click as the signup unless the form is the end state you care about. Use one goal for that completion event in Goals, then keep the definition the same across posts so a page that drives 40 signups and another that drives 12 are measured on the same event.
How do you connect revenue to the post that started it?
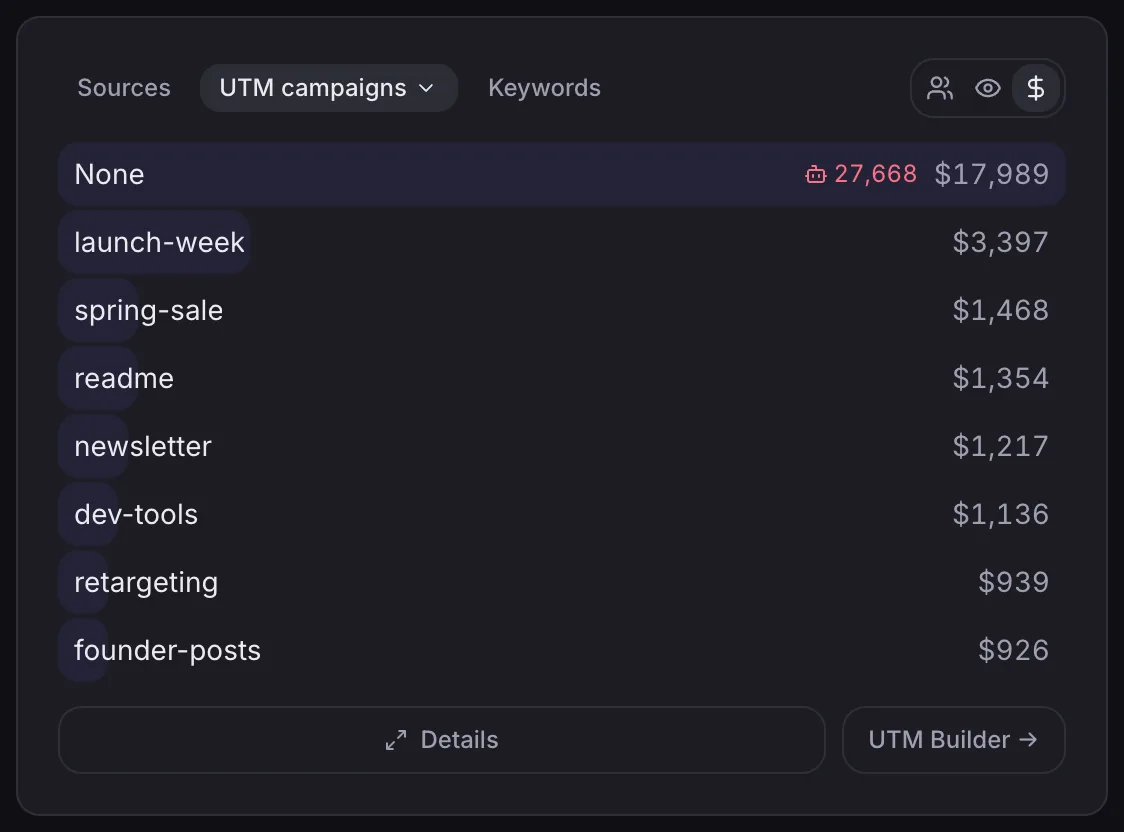
Connect your payment provider once, then let NoirTrack match each sale to the visitor source that was present when the journey began. That is what lets you compare a post that got 300 clicks with a post that produced 8 paid customers. If you need the setup details, see how revenue tracking works and campaign tagging.
What data needs to line up?
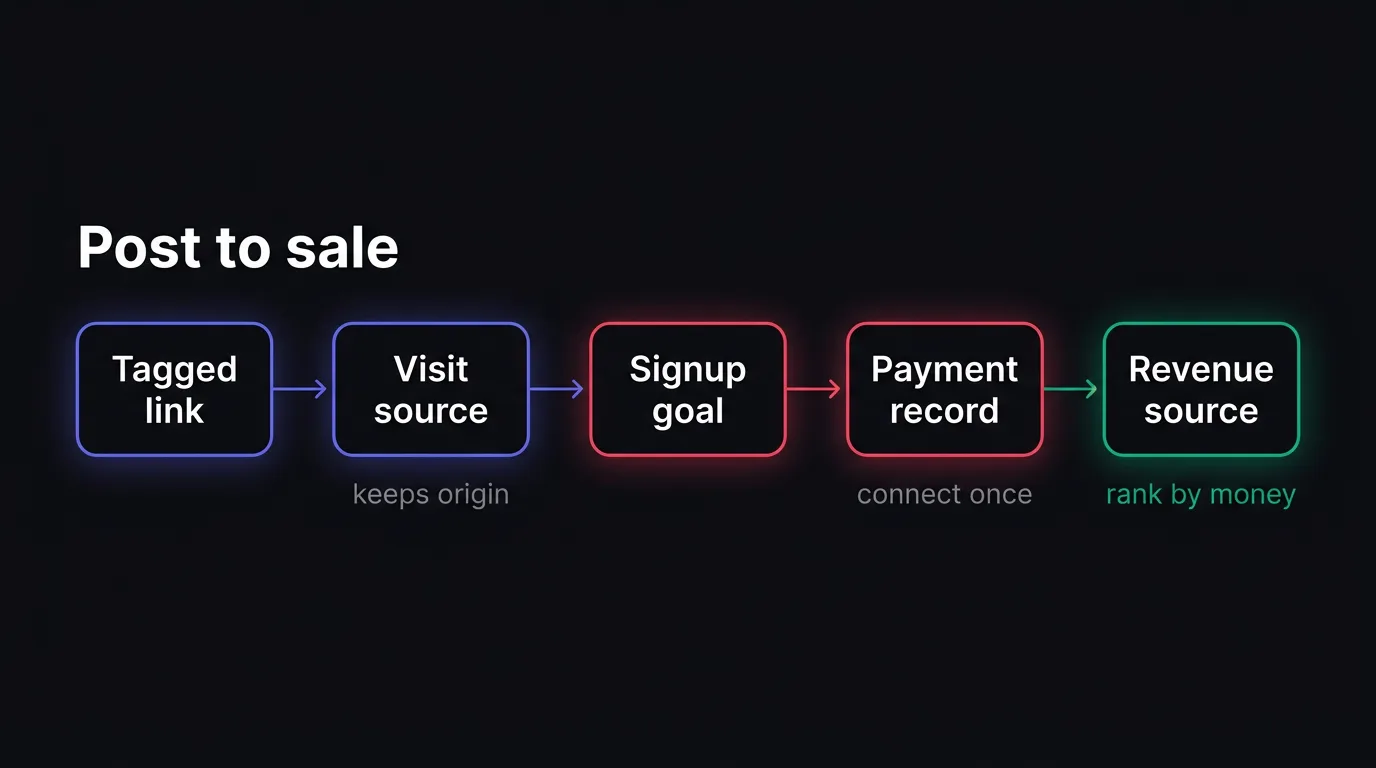
Three pieces need to point to the same visitor journey: the source on the first visit, the signup or checkout event, and the payment record. When those line up, NoirTrack can carry the original post source through to the sale. When they do not, the purchase often falls back to Direct or Unknown, which means the path broke before the payment was recorded.
- Tag the first visit. Add UTM parameters to the link that sends readers to the post, so NoirTrack knows where the visit came from.
- Record the signup or checkout. Fire a goal when the visitor creates an account or starts payment, so the session has a clear conversion point.
- Match the payment. Connect your provider in Site → Settings → Revenue so the sale can inherit the same visitor id or be matched through the success page or email.
A simple example looks like this: a reader lands on /blog/pricing-post?utm_source=linkedin&utm_medium=social&utm_campaign=q2_offer, signs up, then buys later. If the payment lands with that same visitor path, the sale keeps the LinkedIn source and the post gets credit for the revenue.
Which revenue setups work best?
The best setup depends on where money enters your system. A direct provider connection works well when NoirTrack supports your processor, because sales and refunds can sync automatically. The docs list Stripe, Paddle, Polar, Lemon Squeezy, Dodo Payments, and Creem as direct options. If your backend handles billing itself, send the sale with the Payment API or the SDK instead.
| Setup | Best for | What you get |
|---|---|---|
| Provider integration | Supported processors | Automatic sale and refund sync |
| Payment API | Custom billing flows | Server-side sale events you send yourself |
| SDK revenue call | Apps that already use NoirTrack on the site | A quick way to pass amount, currency, and visitor id |
Use the provider path when it fits your stack. Use your backend when it does not. Both let you track which blog posts drive signups and revenue without guessing which article paid off.
What dashboard view shows which posts actually win?
The Sources panel ranked by revenue shows which posts actually win. Start there, then click one utm_campaign or source value to narrow the dashboard to a single post, channel, or traffic slice. That lets you compare visits, signup rate, and revenue on the same screen, so a post with 120 visits and 9 signups can outrank one with 500 visits and 10 signups if the first one brings in more revenue per visitor. Use the filter bar or click a value in the report to hold the view on one article while you judge it. See /docs/filters and /docs/revenue-attribution for the view and the money column.
What should you compare side by side?
Compare post, visits, signups, conversion rate, revenue, and source in one table. That keeps you from reading traffic volume as success when the money sits somewhere else.
| Post | Visits | Signups | Conversion rate | Revenue | Source |
|---|---|---|---|---|---|
/blog/utm-parameters-guide |
120 | 9 | 7.5% | $540 | utm_campaign=spring_launch |
/blog/revenue-attribution-which-traffic-makes-money |
500 | 10 | 2.0% | $310 | utm_campaign=seo |
Use the table to sort by the outcome you care about. A post with fewer visits can still be the better post if it drives more signups per visitor and more revenue from the same traffic slice.
How do you decide which posts deserve more effort?
Promote the posts that already bring in signups or revenue, fix the posts that get traffic but do not convert, and drop the ones that keep missing both. The fastest way to track which blog posts drive signups and revenue is to compare each post's visits, goal completions, and money in one filtered view, then spend time where the numbers already point.
Look for the same post winning for the same reason. A tutorial may convert because it sits near a signup button. A comparison post may convert because it matches buyer intent. If one topic keeps producing sales, write the next article with the same angle and offer placement. If a post ranks but does not convert, keep the traffic and change the page: rewrite the intro, move the CTA higher, or swap the offer.
Revenue only helps here if you connect it to the visitor that started the session. NoirTrack ties sales back to the visit, source, and campaign after you connect your payment provider. See /docs/revenue-attribution.
What is a practical weekly review?
- Open the revenue by source view and narrow it to one blog campaign.
- Check the post with the highest revenue first, then the post with the most traffic but weak conversion.
- Compare signups and revenue together, not as separate reports.
- Pick one winner to promote and one weak post to revise.
- Repeat after every new post or campaign launch.
If a post brought 120 visits, 9 signups, and $540 in sales last week, it deserves more promotion than a post with 400 visits and 2 signups. Use the first post as the model and the second as the edit queue.
What is the fastest way to start this on your site?
Install the snippet or SDK, add one UTM tagged blog link, and create one signup goal before you publish the next article. If money matters, connect your payment provider on day one so you can tie visits, signups, and sales together in /docs/revenue-attribution.
If you already have traffic, start with one article that gets steady visits. That gives you a same-day check instead of waiting for a fresh post to get seen.
What should you check first after launch?
Confirm the first pageview arrives. Confirm the signup goal fires from /docs/goals. Confirm the payment source appears in transactions. Then compare that article with direct traffic and see whether the tagged link gets credit. That is the fastest way to track which blog posts drive signups and revenue without guessing.
Questions, answered.
Tracking which blog posts drive signups and revenue means tying each article to tagged visits, a signup goal, and payment data so you can see which posts create conversions and sales. You follow the path from article click to signup, then to paid customer, instead of stopping at traffic. That gives you the post that starts the sale, not just the post that gets seen.
Post level revenue tracking usually takes one tagging pattern, one signup goal, and one payment connection. If you already have a site and billing system, the setup is mostly wiring, not analysis. The main work is making sure every blog link uses the same campaign names and that signups and purchases can be matched back to the original post.
Pageviews show attention; attribution shows outcomes. A post can get lots of visits and still lose to a smaller post that produces more signups or revenue. Pageviews tell you what people opened, while attribution tells you which article moved them to act. That difference matters when you decide what to update, promote, or stop writing.
The most common mistake is leaving links untagged or using inconsistent campaign names, which splits one post across several sources and hides the winner. One article can then appear as direct traffic, organic search, and email at the same time. Use one naming pattern for every post so each result rolls into a single view.
Try NoirTrack
See which traffic actually pays.
Analytics with revenue attribution and a built-in bot firewall. One script tag, live in two minutes.
Free 14-day trial, no credit card
Written by NoirTrack team
The privacy-first Google Analytics alternative with a built-in bot firewall and revenue attribution. See which traffic makes you money, no cookie banner.


